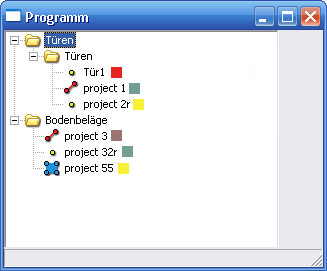
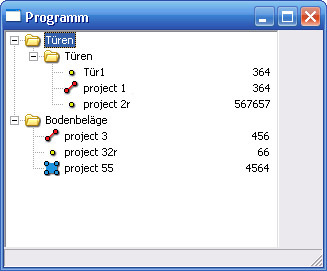
:-P
1. No
2. Just tried it now, and inserting a "~t" in between two strings doesn't make any differnce, so No.
3. No
You're not having much luck here are you... :-(
I think what you probably want is a multi-column listbox - one of the most frequently requested gadgets from MaxGUI users.
My only suggestion would be to perhaps look at some of the community contributed hacks (if you are only wanting to compile on Windows):
http://www.blitzbasic.com/Community/posts.php?topic=53343SuperStrict
Import MaxGUI.Drivers
?Win32
AppTitle = "Multi-Column Listbox Example"
Global wndMain:TGadget = CreateWindow(AppTitle,100,100,400,300,Null,WINDOW_TITLEBAR)
Global lstMultiColumn:TGadget = CreateListBox(0,0,ClientWidth(wndMain),ClientHeight(wndMain),wndMain,0)
For Local r% = 1 To 10
AddGadgetItem lstMultiColumn, ""
Next
For Local c% = 1 To 5
AddListBoxColumn(lstMultiColumn, c-1, "Column " + c, 100)
For Local r% = 1 To 10
AddListBoxItem(Int(lstMultiColumn,Rnd()*1000),r-1,c-1)
Next
Next
Repeat
Select WaitEvent()
Case EVENT_WINDOWCLOSE, EVENT_APPTERMINATE;End
EndSelect
Print CurrentEvent.ToString()
Forever
'MultiColumn List Box Code (created by Ziltch, adapted by Regular K)
'http://www.blitzbasic.com/Community/posts.php?topic=53343
Extern "win32"
Function SetWindowLongA:Int(hWnd:Int,nIndex:Int,lNewLong:Int)
Function GetModuleHandleA:Int(lMod:Long)
Function GetWindowLongA:Int(hWnd:Int,nIndex:Int)
Function MoveWindow(hWnd:Int,X:Int,Y:Int,nWidth:Int,nHeight:Int,bRepaint:Byte)
End Extern
Const LBS_DISABLENOSCROLL:Int = 4096
Const LBS_EXTENDEDSEL:Int = $800
Const LBS_HASSTRINGS:Int = 64
Const LBS_MULTICOLUMN:Int = 512
Const LBS_MULTIPLESEL:Int = 8
Const LBS_NODATA:Int = $2000
Const LBS_NOINTEGRALHEIGHT:Int = 256
Const LBS_NOREDRAW :Int= 4
Const LBS_NOSEL:Int = $4000
Const LBS_NOTIFY:Int = 1
Const LBS_OWNERDRAWFIXED:Int = 16
Const LBS_OWNERDRAWVARIABLE:Int = 32
Const LBS_SORT:Int = 2
Const LBS_STANDARD:Int = $a00003
Const LBS_USETABSTOPS:Int = 128
Const LBS_WANTKEYBOARDINPUT:Int = $400
Const LVM_FIRST:Int = $1000
Const LVM_GETCOLUMNA:Int =(LVM_FIRST+25)
Const LVM_GETCOLUMNW:Int =(LVM_FIRST+95)
Const LVM_SETCOLUMNA:Int =(LVM_FIRST+26)
Const LVM_SETCOLUMNW:Int =(LVM_FIRST+96)
Const LVM_INSERTCOLUMNA:Int =(LVM_FIRST+27)
Const LVM_INSERTCOLUMNW:Int =(LVM_FIRST+97)
Const LVM_DELETECOLUMN:Int =(LVM_FIRST+28)
Const LVM_GETCOLUMNWIDTH:Int =(LVM_FIRST+29)
Const LVM_GETITEMA:Int = (LVM_FIRST+5)
Const LVM_GETITEMW:Int = (LVM_FIRST+75)
Const LVM_SETITEMA:Int = (LVM_FIRST+6)
Const LVM_SETITEMW:Int = (LVM_FIRST+76)
Const LVM_INSERTITEMA:Int = (LVM_FIRST+7)
Const LVM_INSERTITEMW:Int = (LVM_FIRST+77)
Const LVM_DELETEITEM:Int = (LVM_FIRST+8)
Const LVM_DELETEALLITEMS:Int = (LVM_FIRST+9)
Const LVM_GETCALLBACKMASK:Int = (LVM_FIRST+10)
Const LVM_SETCALLBACKMASK:Int =(LVM_FIRST+11)
Const LVM_SETCOLUMNWIDTH:Int =(LVM_FIRST+30)
Const LVM_GETTEXTCOLOR:Int =(LVM_FIRST+35)
Const LVM_SETTEXTCOLOR:Int =(LVM_FIRST+36)
Const LVM_GETTEXTBKCOLOR:Int =(LVM_FIRST+37)
Const LVM_SETTEXTBKCOLOR:Int = (LVM_FIRST+38)
Const LVCF_FMT:Int =1
Const LVCF_WIDTH:Int =2
Const LVCF_TEXT:Int =4
Const LVCF_SUBITEM:Int =8
Const LVCF_IMAGE:Int= 16
Const LVCF_ORDER:Int =32
Const LVIF_TEXT:Int = 1
Const LVS_ICON:Int =0
Const LVS_REPORT:Int =1
Const LVS_SMALLICON:Int =2
Const LVS_LIST:Int =3
Const LVS_TYPEMASK:Int =3
Const LVS_SINGLESEL:Int =4
Const LVS_SHOWSELALWAYS:Int =8
Const LVS_SORTASCENDING:Int =16
Const LVS_SORTDESCENDING:Int =32
Const LVS_SHAREIMAGELISTS:Int =64
Const LVS_NOLABELWRAP:Int =128
Const LVS_AUTOARRANGE:Int =256
Const LVS_EDITLABELS:Int =512
Const LVS_NOSCROLL:Int =$2000
Const LVS_TYPESTYLEMASK:Int =$fc00
Const LVS_ALIGNTOP:Int =0
Const LVS_ALIGNLEFT:Int =$800
Const LVS_ALIGNMASK:Int =$c00
Const LVS_OWNERDRAWFIXED:Int =$400
Const LVS_NOCOLUMNHEADER:Int =$4000
Const LVS_NOSORTHEADER:Int =$8000
Const GWL_STYLE:Int = -16
Type LVCOLUMN
Field mask:Int
Field fmt:Int
Field cx:Int
Field pszText:Byte Ptr
Field cchTextMax:Int
Field iSubItem:Int
EndType
Type LVITEM
Field mask:Int
Field iItem:Int
Field iSubItem:Int
Field iState:Int
Field stateMask:Int
Field pszText:Byte Ptr
Field cchTextMax:Int
Field iImage:Int
Field lParam:Int
Field iIndent:Int
Field iGroupId:Int
Field cColumns:Int
Field puColumns:Int
EndType
Function AddListBoxColumn(ListBox:TGadget,Column:Int,HeadingText:String,Width:Int,Style:Int = 0)
Local ListboxHwnd:Int=QueryGadget(ListBox,QUERY_HWND)
Local col:LVCOLUMN = New LVCOLUMN
Col.mask = LVCF_WIDTH | LVCF_TEXT | LVCF_FMT
Col.fmt = Style
Col.cx = Width
col.pszText = HeadingText$.ToCString()
' Col.cchTextMax = Text$.Length + 1
Local ListBoxstyle:Int = GetWindowLongA(ListboxHwnd , GWL_STYLE)
SetWindowLongA(ListboxHwnd , GWL_STYLE, ListBoxstyle ~ LVS_NOCOLUMNHEADER | LBS_MULTICOLUMN) 'change the style so that we have headings
SendMessageA(ListboxHwnd,LVM_INSERTCOLUMNA,Column,Int(Byte Ptr Col))
End Function
Function ListBoxHeading(ListBox:TGadget,Column:Int,Text:String)
Local ListboxHwnd:Int=QueryGadget(ListBox,QUERY_HWND)
Local col:LVCOLUMN = New LVCOLUMN
Col.mask = LVCF_TEXT| LVCF_FMT
col.pszText = Text$.ToCString()
' Col.cchTextMax = Text$.Length + 1
SendMessageA(ListboxHwnd,LVM_SETCOLUMNA,Column,Int(Byte Ptr Col))
End Function
Function ListBoxColumnWidth(ListBox:TGadget,Column:Int,width:Int)
Local ListboxHwnd:Int=QueryGadget(ListBox,QUERY_HWND)
Local col:LVCOLUMN = New LVCOLUMN
Col.mask = LVCF_WIDTH
col.cx = width
SendMessageA(ListboxHwnd,LVM_SETCOLUMNA,Column,Int(Byte Ptr Col))
End Function
Function AddListBoxItem(ListBox:TGadget,Text:String,Row:Int,Column:Int)
Local ListboxHwnd:Int=QueryGadget(ListBox,QUERY_HWND)
Global ColItem:LVITEM = New LVITEM
ColItem.mask = LVIF_TEXT
ColItem.iSubItem = Column
ColItem.iItem = Row
ColItem.pszText = Text$.ToCString()
ColItem.cchTextMax = Text$.Length + 1
SendMessageA( ListboxHwnd,LVM_SETITEMA,0,Int(Byte Ptr ColItem))
End Function
Otherwise, you might want to consider looking at Brucey's wxWidgets GUI library wrapper:
wxMax.