How do I draw a radar triangle?

BlitzMax Forums/BlitzMax Beginners Area/How do I draw a radar triangle?

How do I draw a radar triangle of various sizes?

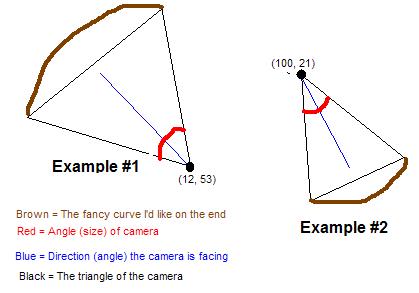
Take a look at this graphic:

If you read the text, you may substitute the word "camera" for "radar".

Basically what I'm trying to do is create radar triangles of different sizes (eg. the angle of the cone [eg. width of the radar] and distance [eg. how long it is]).

I'd also like to draw that fancy curve at the end of the radar triangle if possible... (kind of like a pie slice of a circle, etc)

Thanks for any help!

Use an image, rotate and scale it. Simplest for collision if you wanted to have that

the round part will otherwise not end that funny.

alternatively you can (must) use a texture polygon routine

Thanks for the reply...

How would I adjust the angle of the radar? (eg. suppose the radar was 170 degrees wide)

set the image handle to where the focal point of the radar is, then use setrotation to set the angle of the radar.
use:
setimagehandle(image:timage,x#,y#)
setrotation(angle#)
[edited]
I posted it wrong it's not sethandle - corrected

Or you can draw the pie like I did in the "How to draw something like a pie chart" post.

Here is some example code that you can change to draw your radar thing:
SuperStrict

Graphics 800, 600, 0

Local pie1:TPieClock = TPieClock.Create(300, 300, 12, 2, 20000)'	centerX, centerY, radius, margin, duration
pie1.start()
Local pie2:TPieClock = TPieClock.Create(500, 300, 124, 10, 10000)'	centerX, centerY, radius, margin, duration
pie2.start()

While Not KeyHit(KEY_ESCAPE)
	Cls
	pie1.update()
	pie2.update()

	pie1.draw()
	pie2.draw()
	Flip
Wend
End

Type TPieClock
	Field pfX#
	Field pfY#
	Field pfR#
	Field pfMargin#
	Field pfAngle# = 0
	Field pfCircumference#	'I use this to calculate the correct number of lines to be drawn in the drawSegment() method

	'	background color
	Field piR1% = 70
	Field piG1% = 90
	Field piB1% = 90

	'	segment color
	Field piR2% =  30
	Field piG2% = 170
	Field piB2% =  80

	'	timer values
	Field piStart%
	Field pfDuration#		'in milliseconds
	
	Function Create:TPieClock(fx#, fy#, fr#, fm# = 0, fDur# = 1000)
		Local p:TPieClock = New TPieClock
		p.pfX = fx
		p.pfY = fy
		p.pfR = fr
		p.pfMargin = Min(fm, fr-1)
		p.pfCircumference = 2 * Pi * (fr-fm)
		p.pfDuration = fDur
		Return p
	End Function

	Method start()
		piStart = MilliSecs()
	End Method

	Method update()
		Local p# = eTime()
		If p>=1 Then 
			'ok, time's up
			p = 1
		End If
		pfAngle = p * 360
	End Method
	
	Method draw()
		SetColor(piR1, piG1, piB1)
		DrawOval(pfX - pfR, pfY - pfR, pfR * 2, pfR * 2)
		drawSegment() 
	End Method
	
	'	draws the segment
	Method drawSegment()
		SetColor(piR2, piG2, piB2)
		Local r# = pfR - pfMargin
		Local s# = pfAngle / ((pfAngle/360) * pfCircumference)
		'		s# = angle Step size; To be sure the While-Wend loop will draw exactly enough lines To cover the segment 
		
		Local a# = 0
		While a < pfAngle
			DrawLine(pfX-0.5, pfY-0.5, pfX-0.5 + Cos(a-90) * r, pfY-0.5 + Sin(a-90) * r, 0)
			a:+s
		Wend
		DrawLine(pfX-0.5, pfY-0.5, pfX-0.5 + Cos(pfAngle-90) * r, pfY-0.5 + Sin(pfAngle-90) * r, 0)
		'		I draw this line at the exact angle location 
	End Method

	Method eTime#()
		Return (MilliSecs() - piStart) / pfDuration
	End Method
	
End Type


Good luck!
Strict

Graphics 1280,800,16,80

Local SweepStart:Float = 180.0	'Degrees Clockwise
Local SweepEnd:Float = 360.0
Local SweepRate:Float = .75;
Local SweepDistance:Float = 375
Local SweepOriginX:Float = GraphicsWidth() / 2
Local SweepOriginY:Float = GraphicsHeight() / 2

Local SweepAngle:Float = SweepStart

Type EndPoint

	Global EPList:TList = New TList

	Field X:Float, Y:Float
	Field FadeRate:Float = 250000
	Field Ticks:Int = MilliSecs() + FadeRate
	Field Alive:Int = True
	Field r:Float = 255
	
	Method Render()
		Local Diff:Float = Float(Abs(MilliSecs() - Ticks)) / FadeRate
		r :* Diff
		SetColor 0, r, 0
		Plot X, Y
		If MilliSecs() > Ticks Then Alive = False
	End Method

	Function RenderAll()
		For Local ep:EndPoint = EachIn EndPoint.EPList
			ep.Render()
			If Not ep.Alive Then EndPoint.EPList.Remove(ep)
		Next
	End Function
	
	Function Create:EndPoint(XPos:Float, YPos:Float)
		Local ep:EndPoint = New EndPoint
		ep.X = XPos; ep.Y = YPos
		Return ep
	End Function

End Type

While Not KeyHit(KEY_ESCAPE)
	Cls
	Local epX:Float = SweepOriginX + Sin(SweepAngle) * SweepDistance
	Local epY:Float = SweepOriginY - Cos(SweepAngle) * SweepDistance
	Local epX2:Float = SweepOriginX + Sin(SweepAngle) * SweepDistance / 2
	Local epY2:Float = SweepOriginY - Cos(SweepAngle) * SweepDistance / 2
	Local ep1:EndPoint = EndPoint.Create(epX, epY)
	Local ep2:EndPoint = EndPoint.Create(epX2, epY2)
	'ep2.FadeRate = 250000 * .75
	SetColor 0,255,0
	DrawLine SweepOriginX, SweepOriginY, epX, epY
	EndPoint.EPList.AddLast(ep1)
	EndPoint.EPList.AddLast(ep2)
	SweepAngle :+ SweepRate
	'If SweepAngle > SweepEnd Or SweepAngle < SweepStart Then SweepRate = -SweepRate
	EndPoint.RenderAll()
	Flip
	
Wend